Create Once, Deploy Everywhere
Portable H5P
Browse this website to learn how to deploy your H5Ps across different platforms.
Why H5P?
H5P is a free, open technology that helps reduce barriers to access while empowering educators to create engaging interactive content. It’s well supported, with clear documentation and examples that let you explore H5P activities before building your own. H5P content is also designed with accessibility in mind, having been tested against Web Content Accessibility Guidelines using tools like screen readers and keyboard navigation. Most importantly, once created, H5P activities are portable which makes it easy to reuse and share them across different platforms and learning environments.
Lumi
Lumi is a tool for creating H5P content, the interface is exactly the same as other H5P editors. The free desktop version lets you work offline on your computer, while the cloud-based version requires a paid subscription. Both options provide the same editing capabilities for building quizzes, interactive videos, presentations, and educational games.
Portability Across Platforms
H5P integrates directly with platforms like Moodle, WordPress, and Pressbooks, allowing you to create interactive content where you’re already working. One of H5P’s key strengths is its portability. You can build content once and use it across multiple platforms, or create it offline and deploy it wherever needed. H5P content is also responsive, automatically adapting to work smoothly on computers, tablets, and smartphones, so learners have a consistent experience on any device.
Embedding H5P content into websites and learning management systems creates meaningful interactive learning experiences. H5P transforms passive reading into active participation through quizzes, drag-and-drop activities, and interactive videos, leading to better retention and understanding. The immediate feedback feature helps learners identify gaps in their knowledge right away, allowing them to adjust their approach in real time. Interactive elements also encourage visitors to explore information at their own pace, clicking through sections in any order and revisiting content as needed. This self-directed approach respects different learning styles and helps people remember information more effectively than static text alone.
Click the following buttons to learn more about each platform and how to embed an H5P in it:
WordPress
WordPress makes it straightforward to add H5P content to your site. If you’ve already created an H5P file on another platform or Lumi, you can upload it directly to WordPress and embed it in any page or post. The following written instructions will guide you through the upload process.
Uploading H5P to WordPress
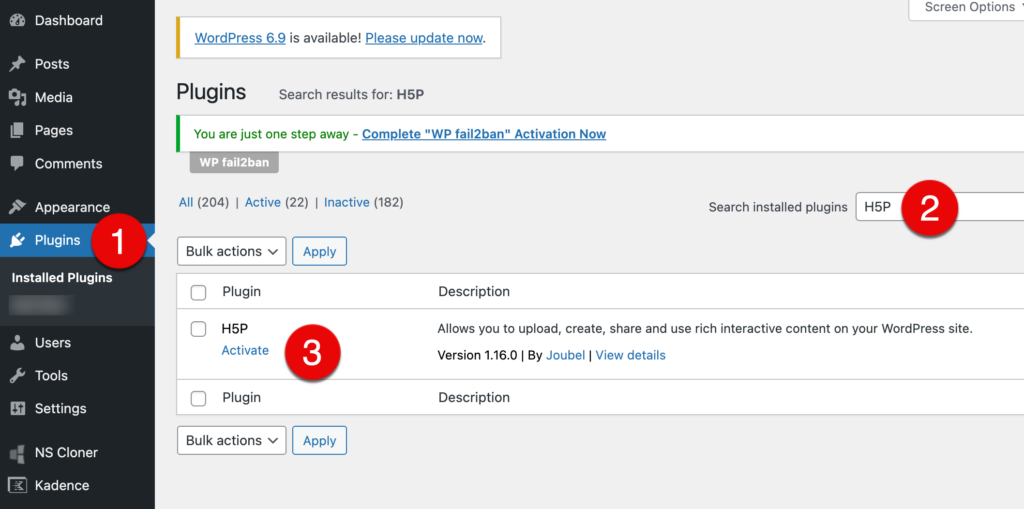
Installing the H5P Plugin
Before you can upload H5P content, you’ll need to install the H5P plugin in WordPress.
- From your WordPress dashboard, click on Plugins in the left menu.
- Use the search box to find “H5P.”
- Click Activate next to the H5P plugin.
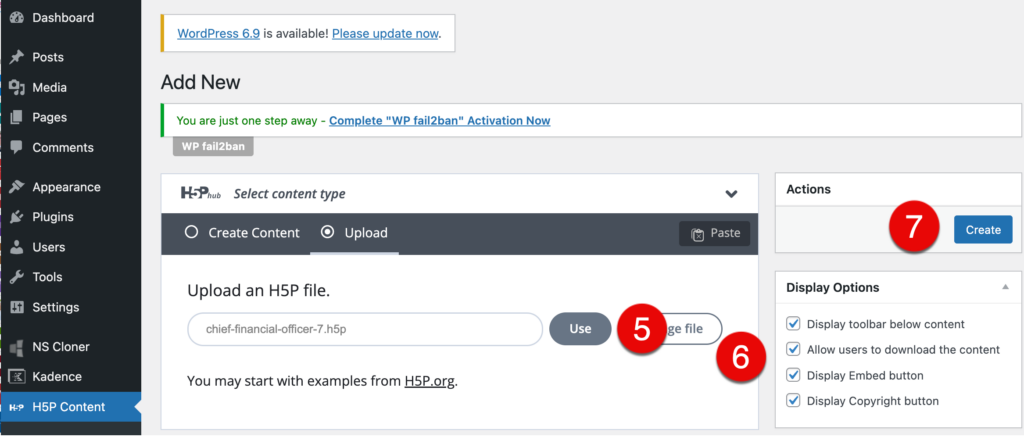
Uploading Your H5P File
Once the plugin is installed, you can upload your H5P content.
- Click H5P Content in the left menu of your WordPress dashboard.
- Select Add New. (If this is your first time using the plugin, click the “I give consent to the Hub” button when prompted)
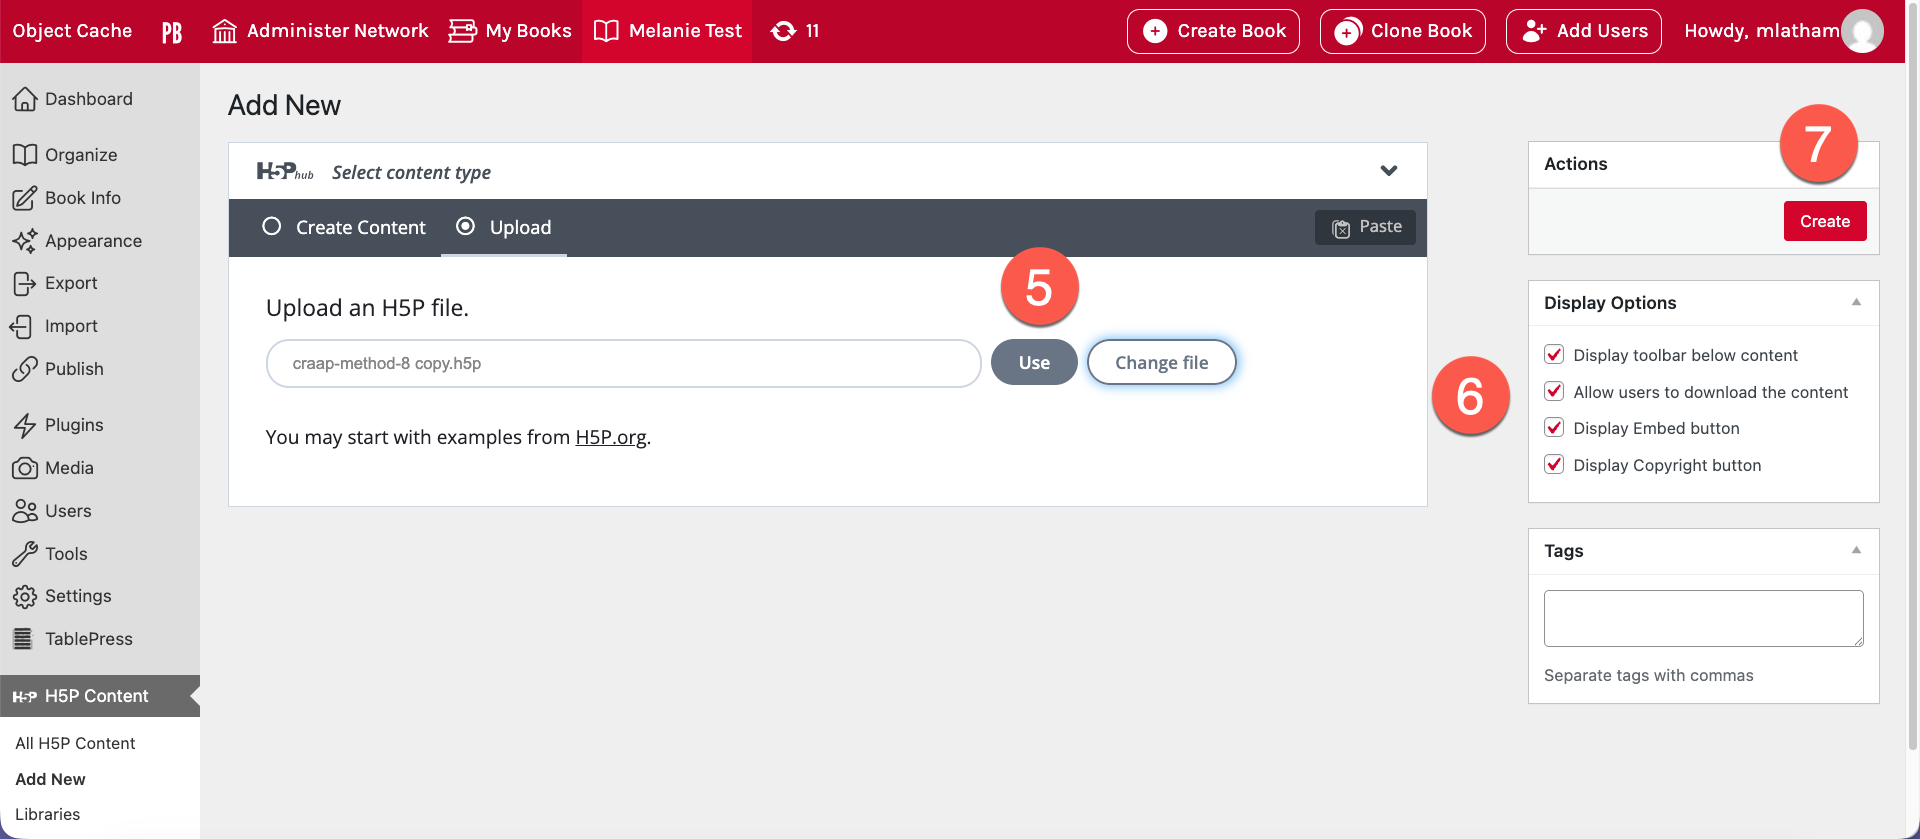
- Click the Upload radio button.
- Click the Upload File button and use the file picker to select your H5P file.

- Click Use once you’ve selected your file.
- Choose your preferred display options.
- Click Create.
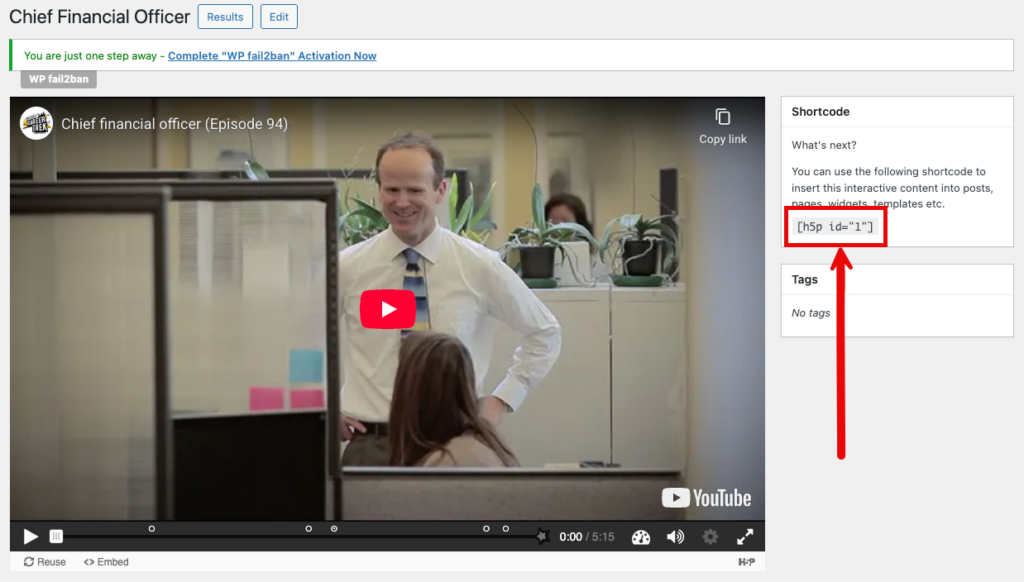
Adding H5P to a Page or Post
After creating your H5P content, WordPress will provide a shortcode. Simply copy this shortcode and paste it into any page or post where you want the interactive content to appear.
Pressbooks
Adding H5Ps to Pressbooks makes the content more interactive and allows learners to practice what they are learning to help them better retain it. If you’ve created an H5P file in Lumi or another platform, you can upload it directly to Pressbooks and embed it on any page. The instructions below walk you through the upload process.
Uploading H5P to Pressbooks
Note: If your institution doesn’t have the H5P plug in installed, visit the “Installing the H5P Plugin” section in the WordPress written instructions above.
Log in to Pressbooks and navigate to the dashboard of the book you’re working on.
- Click the H5P Content menu item.
- Then, click the Add new sub-menu link to upload an H5P file.
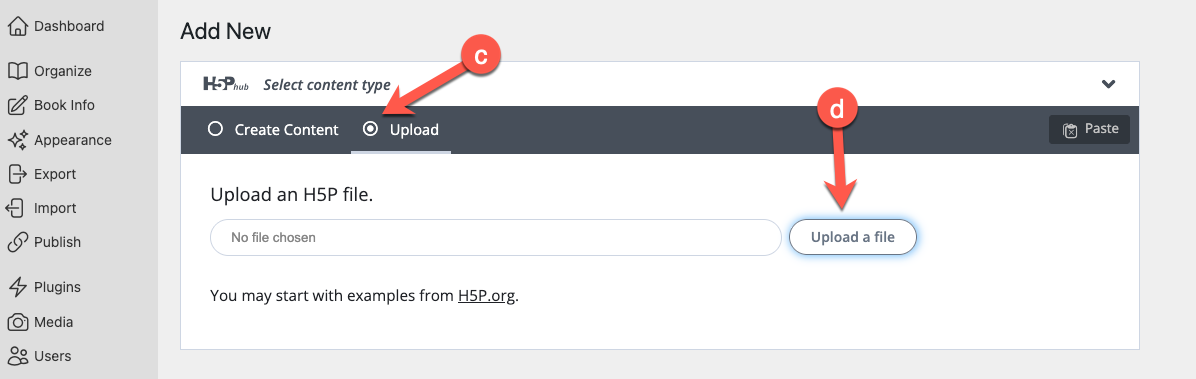
- Click the Upload radio button.
- Click the Upload a file button and select the .h5p file you want to include in your Pressbook.
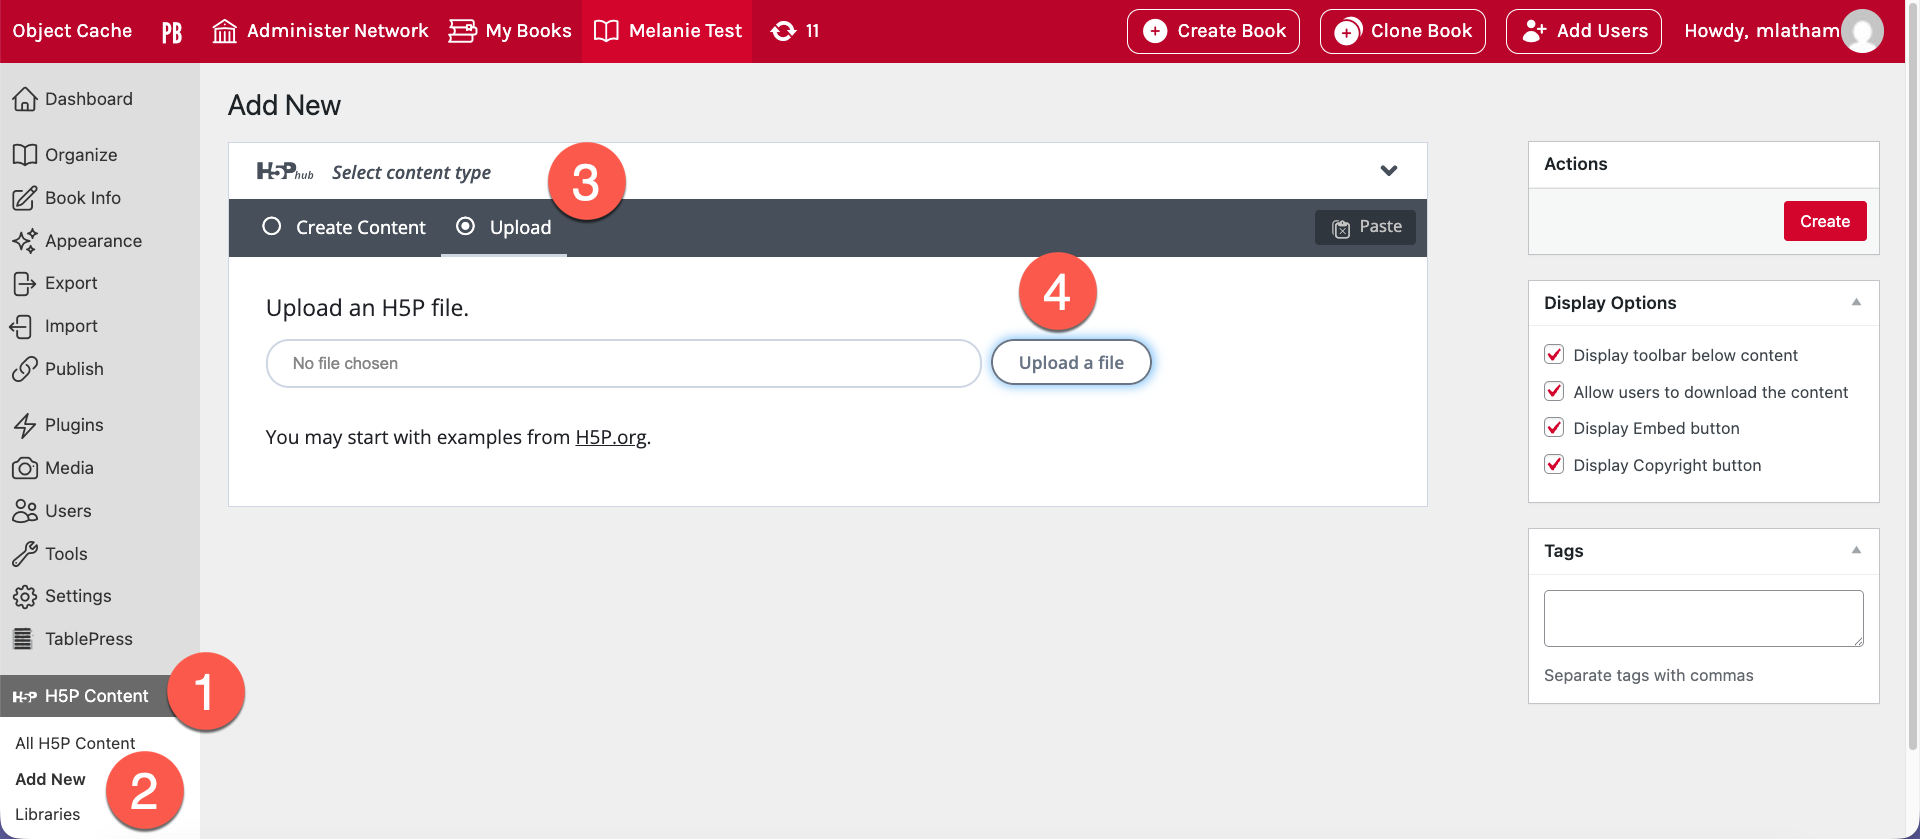
- When the file is uploaded, click the Use button.
- You should now be able to edit your uploaded H5P, if desired. Review the Display Options to consider how you want your H5P to display for others.
- Click the Create button.
Adding H5P to a Chapter
- You will now see a preview of your H5P. Copy the Shortcode in the square brackets as that is what you will use to display the H5P in your book.
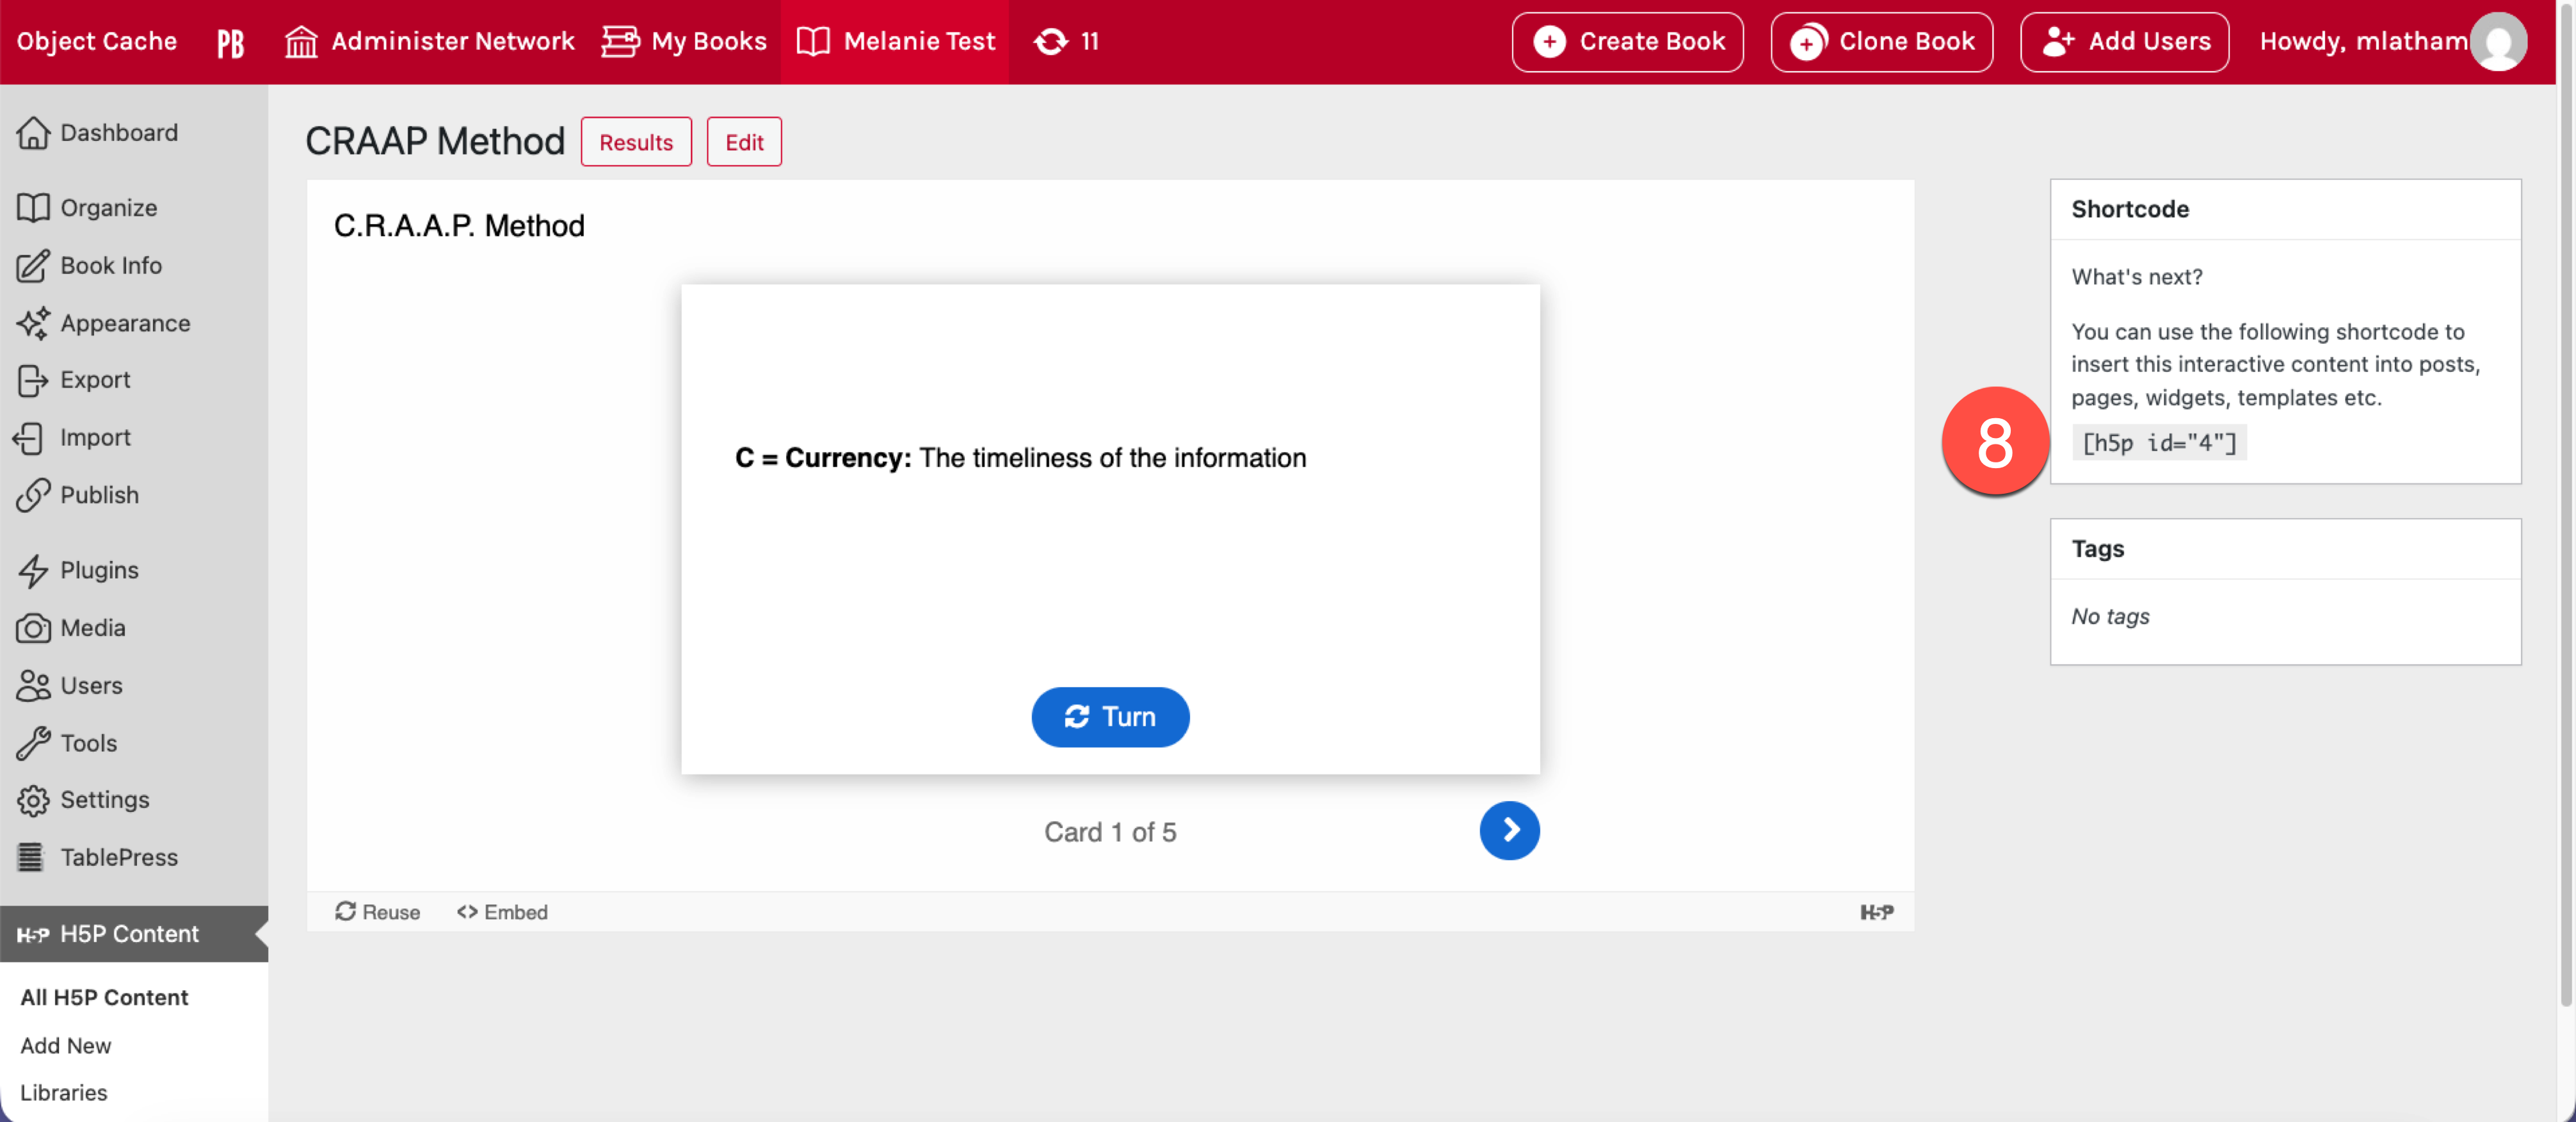
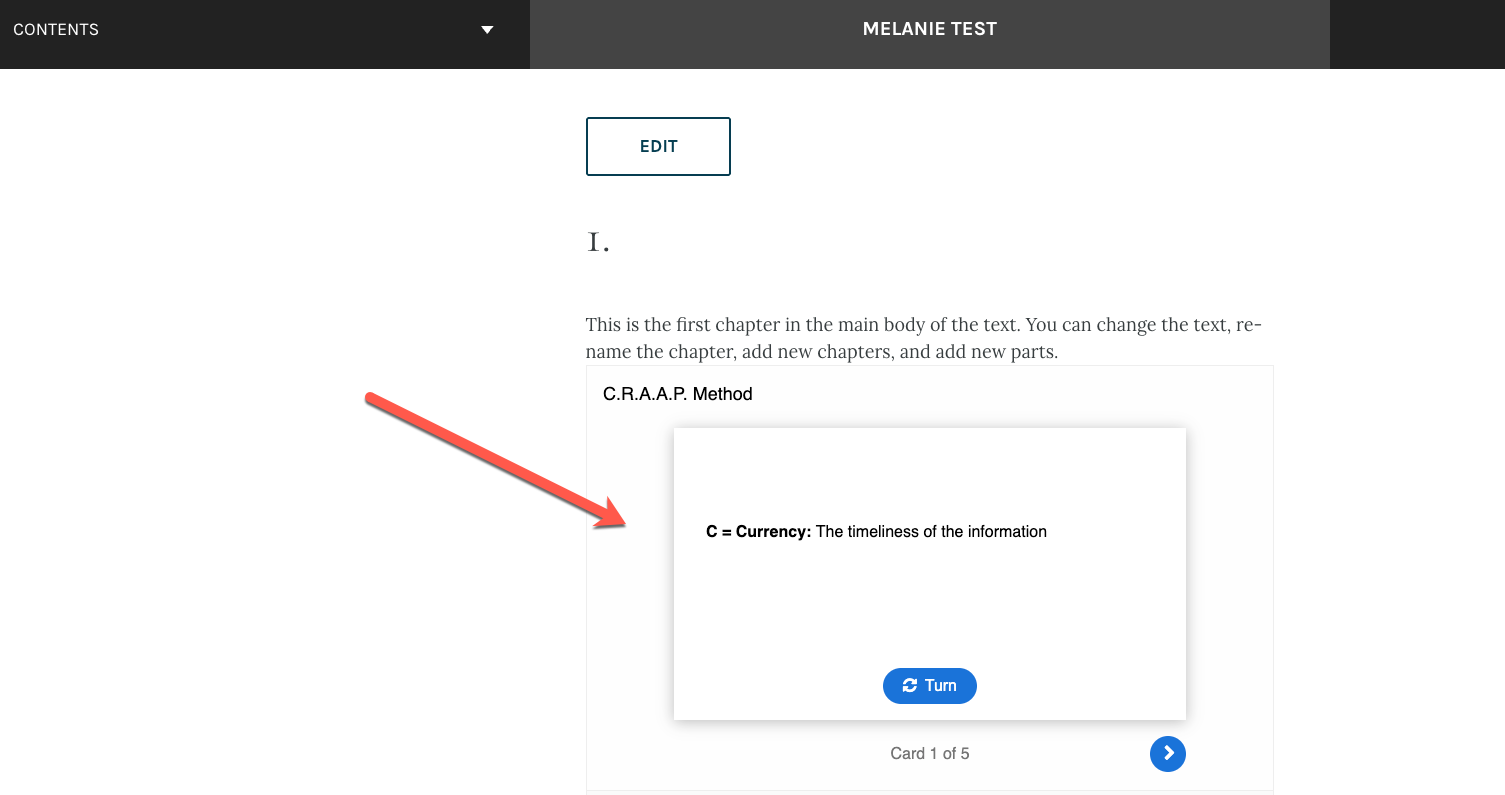
- Navigate to the page of the book where you want to insert the H5P and paste the Shortcode.
- Save your changes.
- The H5P should now appear in your book.
Moodle
Moodle has built-in support for H5P content, making it easy to add interactive activities directly to your courses. If you’ve created an H5P file using Lumi or another H5P editor, you can upload it to Moodle and place it anywhere in your course structure. The following written instructions will walk you through the process.
Uploading H5P to Moodle
There are a two ways to upload an H5P file to Moodle, Drag and Drop and Upload to the Content Bank.
Method 1: Drag and Drop
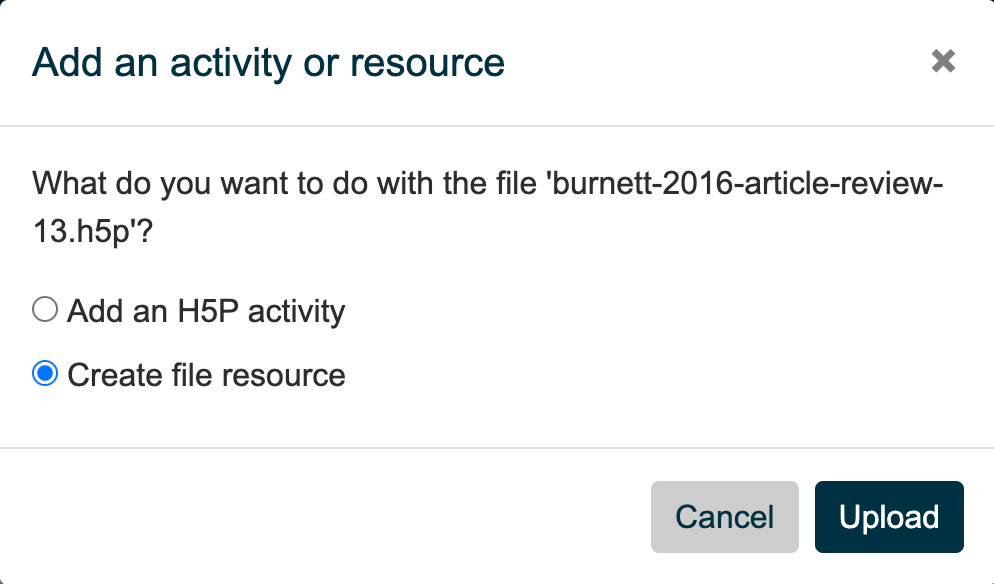
With editing turned on, you can drag and drop an H5P file directly onto your course page. Moodle will ask whether you want to Add an H5P activity or Create a file resource.
Choose Add an H5P activity then click Upload to make the content interactive for students. Note that H5P files added this way won’t appear in your course’s Content Bank, so you won’t be able to edit them within Moodle later.
Avoid choosing Create a file resource, as this adds the H5P as a downloadable file similar to a Word document. This option is useful for sharing resources with colleagues but doesn’t allow students to interact with the content.
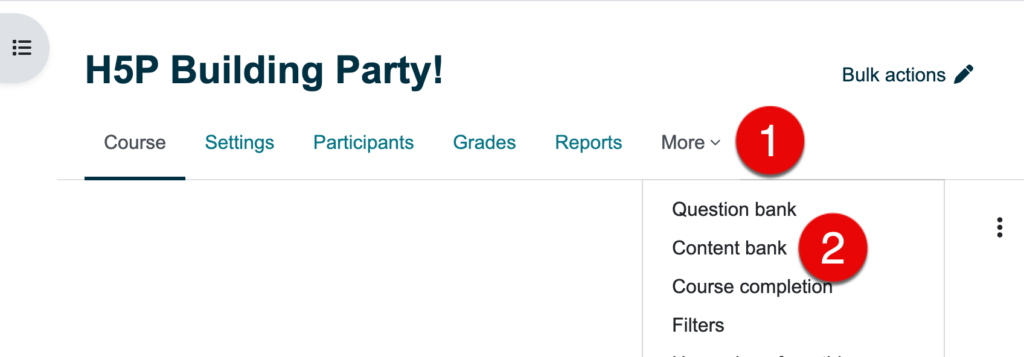
Method 2: Upload to Content Bank (Recommended)
Uploading to the Content Bank gives you more flexibility to edit and manage your H5P content.
- Select Content Bank from the dropdown list.
- From your course page, click More in the main menu.
- Click the Upload button on the right side of the page.
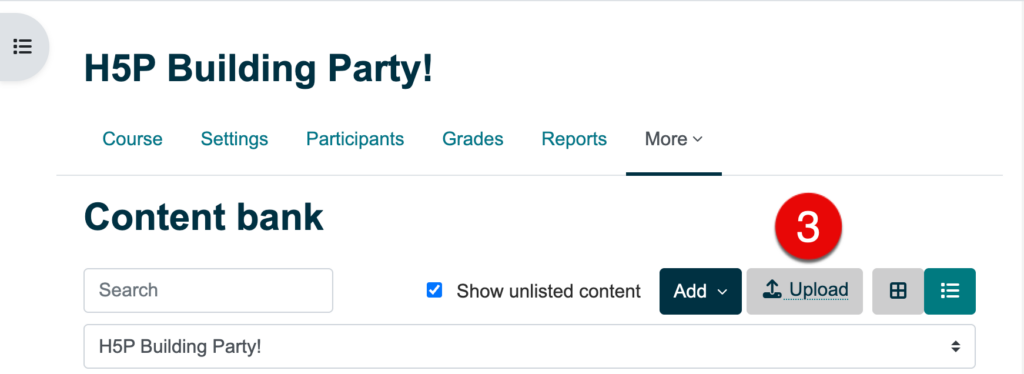
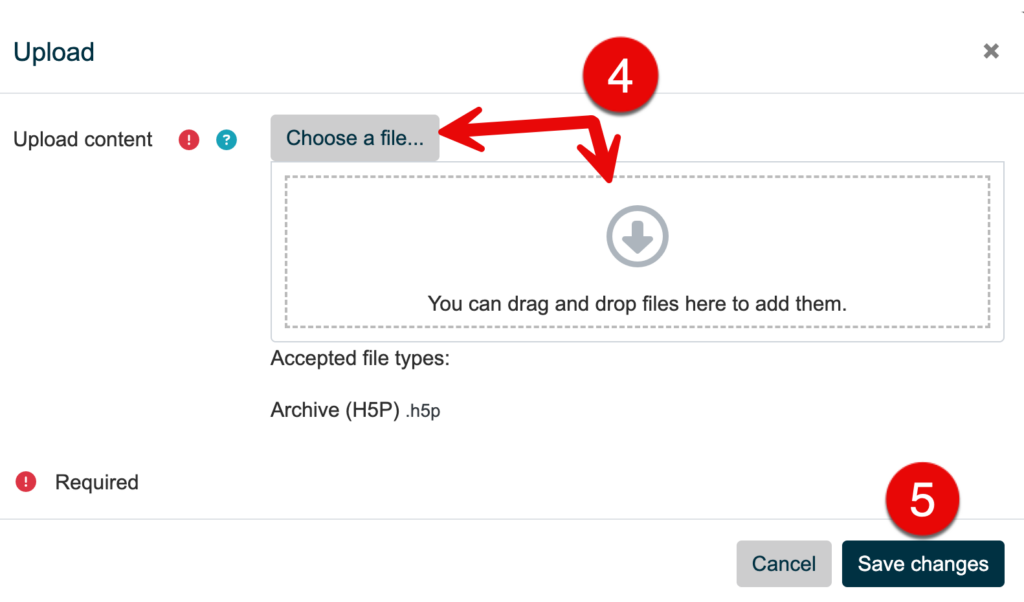
- Either drag and drop your H5P file or click Choose a File to use the file picker.
- Click Save Changes.
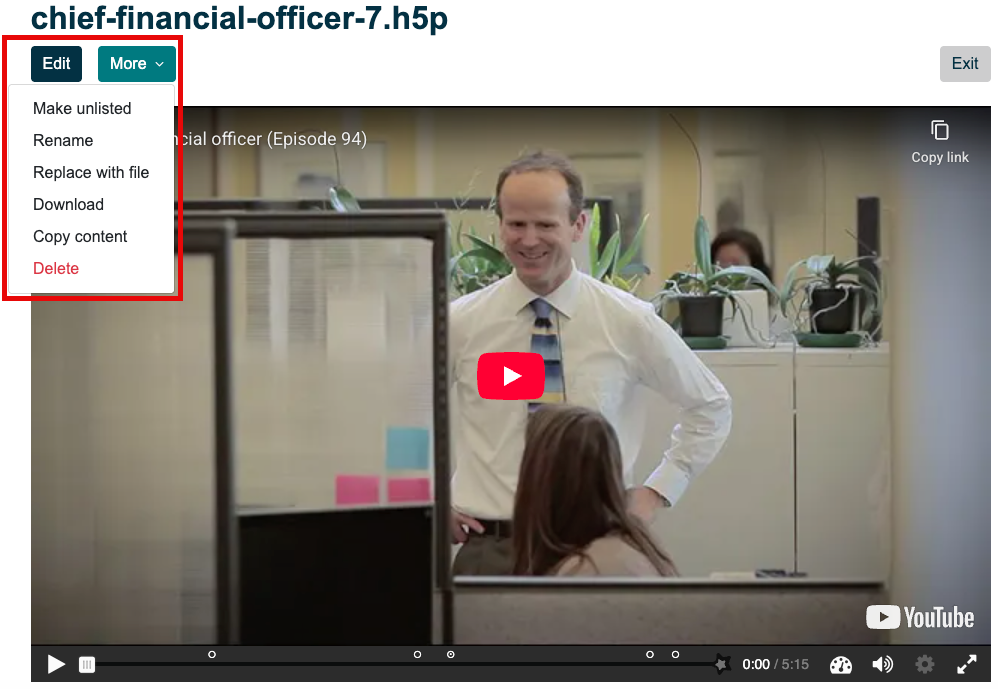
You’ll be taken to your H5P content in the Content Bank, where you can edit, rename, replace, or delete it using the More menu.
Use the activity chooser to add the H5P to you Moodle coure.
Edits to your H5P
If you need to make edits to your H5P file, you can:
- Open the file in Lumi
- Make your revisions
- Save it as an .h5p file
- Replace the file across the platforms
Edits made in Lumi will not automatically be reflected across the platforms. The original file will need to be replaced with the revised file in the platforms it exists in.